CONNECTING THE Kii CONTROL
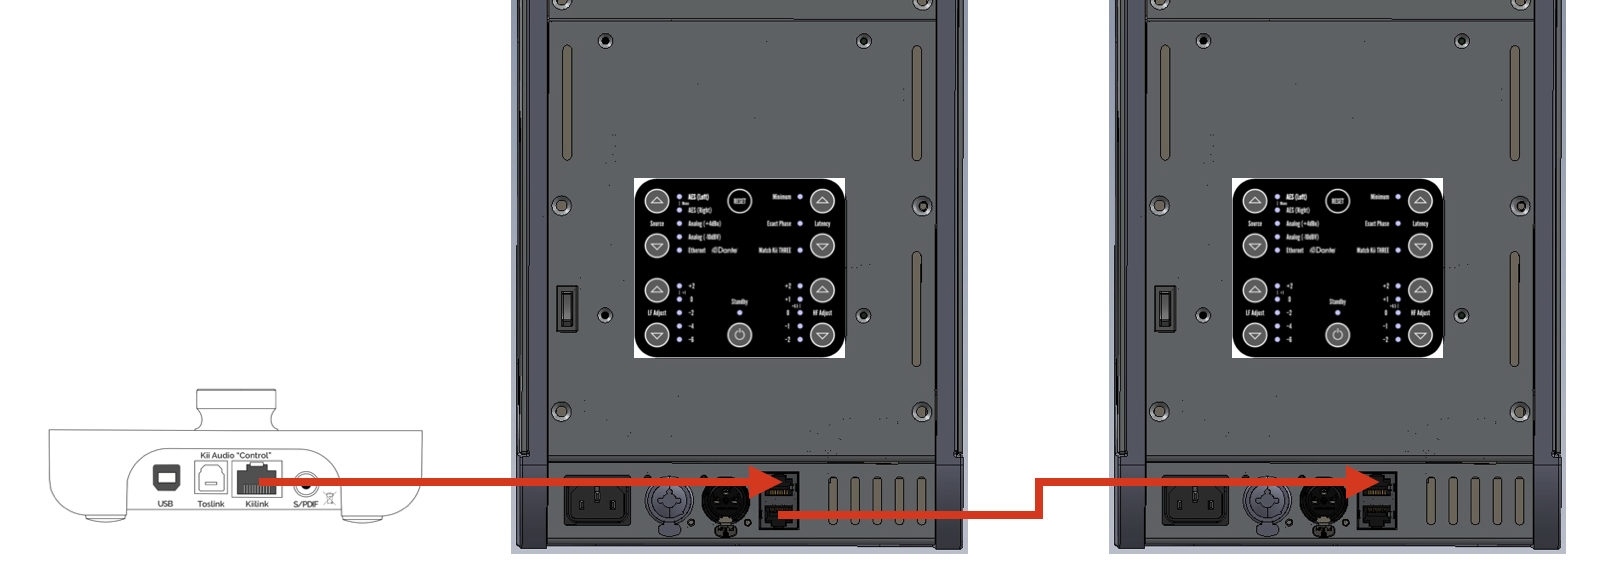
The Kii Control is connected to the first speaker via the supplied CAT6 cable,
plugged into the KiiLink IN (top connector) on the backside connector panel of your Kii SEVEN.
The first speaker is then also connected to the second speaker via the other supplied CAT6 cable,
from the KiiLink THRU (bottom connector) of the first to the KiiLink IN (top connector) of the second speaker.
The connector panel on the Kii Control offers three additional digital inputs:
1. USB (audio)
2. COAX (S/PDIF format)
3. Toslink / Optical (S/PDIF format)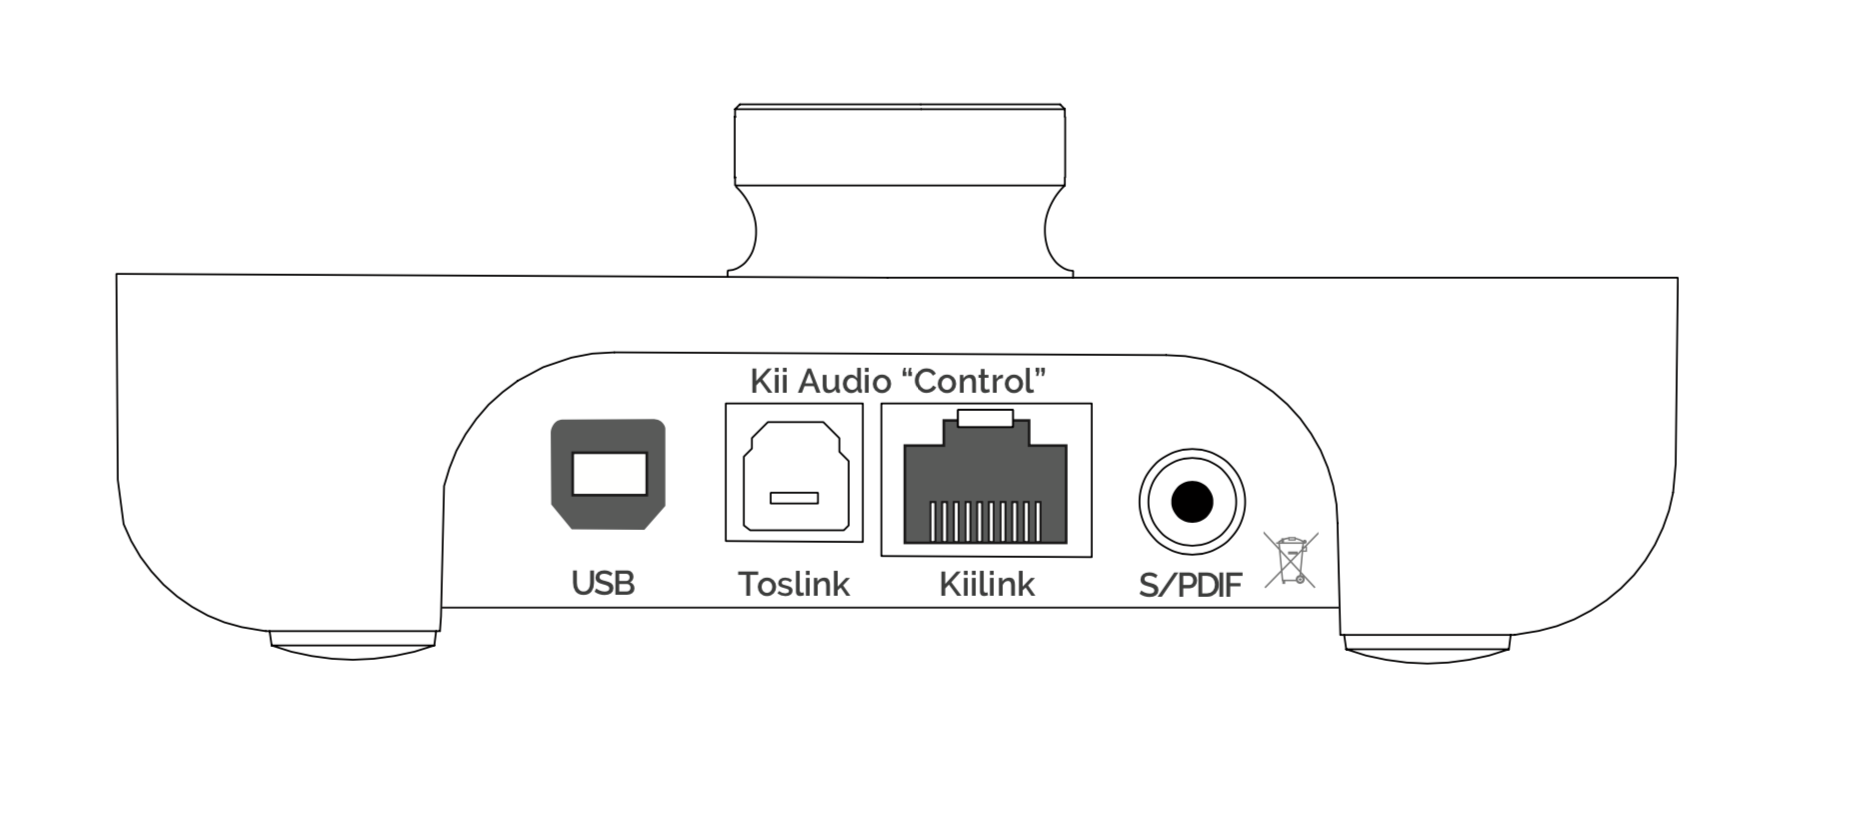
You can select any of the following three inputs via the buttons on the top panel of the Kii CONTROL:
COAX / OPTICAL / USB
Selecting the XLR button will enable the two XLR connections on the backside of the speaker:
- The left XLR input offers analog input via either XLR or 6,3mm TRS.
- The right XLR input offers digital input via AES3 (AES/EBU) format.
Which of the two XLR inputs is active can be selected in the Kii Control Menu under:
Main Menu -> Setup Menu -> XLR Input Settings -> Analog / Digital
THE PRESET BUTTON
The preset button offers direct access to up to six user specified preset settings.
By repeatedly pressing the preset button you can toggle through all preset states that have been previously saved.
You can make can make, add or delete presets and change their global behavior in the Preset menu.
The currently selected preset is indicated by the enlarged colour bar at the top of the display.
Any changes you make to parameters within the menu are automatically saved to the currently selected preset. There is no need to save or confirm your changes. When you switch back to a preset, all its settings will be exactly as you last left them.
You can always toggle through the presets (preset button), even if you are deep inside the menu structure.
That way you can easily set for example a certain parameter for all presets.
USING THE Kii CONTROL
THIS PAGE EXPLAINS THE USE OF THE Kii CONTROL + Kii SEVEN used as a SYSTEM,
without WiFi provisioning via the Kii HOME APP.
MENU NAVIGATION
Horizontal navigation in the menu is done with the dedicated (Esc) and (Enter) buttons,
while vertical scrolling through menu items or parameter values is done by turning the knob.
The push/click function of the knob is not used for navigation.
It always offers the MUTE/DIM function at any given time.
Every change is saved automatically; no save or confirmation dialog exists.
Press Enter to activate the menu.
Now use the knob to scroll through the main menu level until the menu item you want to adjust is highlighted.
Press Enter again to move the cursor right to the next level and set the values with the knob.
If the display shows the desired value, move backward through the menu with the Esc button.
Your setting is now automatically stored.
MENU OVERVIEW
1. TONE CONTROL
2. PRESETS
3. BLUETOOTH
4. PRO MENU (the Pro submenu contains:)
- 4a) Latency
- 4b) Polarity
- 4c) Limiter Indicator (not applicable for Kii SEVEN)
- 4d) Advanced Filters
- 4e) Set reading (xy) to 0
5. SETUP MENU (the Setup submenu contains:)
- 5a) Master Speaker
- 5b) Boundary EQ
- 5c) Mute / Dim
- 5d) XLR Input Settings
- 5e) Auto Standby
- 5f) BXT Settings (not applicable for Kii SEVEN)
- 5g) IR Remote Settings
- 5h) LED Brightness
- 5i) Restore Defaults
- 5j) About
1. TONE CONTROL
The Tone Control menu vastly expands the possibilities of LF Adjust and HF Adjust settings available on the speaker.
Low shelf and high shelf filter both become fully user configurable by adding control over the corner frequencies for both filter settings. This EQ type is called a Baxandall EQ and offers great flexibility with only 4 parameters:
"Bass (dB)" determines if the filter boosts or cuts the frequency range below the corner frequency.
This corresponds to the LF Adjust on the speaker control panel.
"Treble (dB)" determines if the filter boosts or cuts the frequency range above the corner frequency.
This corresponds to the HF Adjust on the speaker control panel.
"Bass Freq." determines the frequency below which this filter alters the frequency response of the audio signal.
"Treble Freq." determines the frequency above which this filter alters the frequency response of the audio signal.
In combination these two filters offer vast options to tailor the speakers frequency response to your desire.
If you want to cut a certain part of the midrange spectrum, simply boost the low and high frequencies outside the desired midrange spectrum and adjust the level accordingly, respectively vice versa for boosting it.
The gentle filter slopes will make sure that the resulting frequency response will always stay musical and useful for listening.
The parameter choice is:
Bass (dB)
Treble (dB)
Bass Freq.
Treble Freq.
2. PRESETS
In this menu, you can enable your own presets, which you can toggle through with the dedicated preset button.
As soon as a second preset is defined, the presets will be indicated by color-coded bars appearing in the display's upper area.
To add a preset of your choice, set the Kii CONTROL to the exact state that you want to add as a preset.
Enter the Program Preset menu and go through the available options in order to exclude or include certain parameters:
(Source, Delay/Lip Synch, Volume, Mid/Side/Polarity, Contour). This defines a global setting for all presets!
If you set one of these parameters to „No“, it is excluded from the preset function and remains manually available from the Kii CONTROL. If all parameters are set to your liking scroll to „Add new preset“ and press ENTER.
Your preset is now successfully saved and will be available, when toggling the preset button.
If you want to remove a preset, simply select it with the preset button, scroll to Remove This Preset and press ENTER.
The preset is now permanently erased again. Scroll and choose „Remove All Presets“, if you want to get rid of all existing presets and set them up from scratch.
The parameter choice is:
Remove This Preset
Remove All Presets
Make 2 presets (Add third preset, Add fourth preset, etc.)
+ Source (default: NO)
+ XLR Mode (default: Yes)
+ Delay/Lip Synch (default: Yes)
+ Phase Correction (default: Yes)
+ Volume (default: NO)
+ Mid/Side/Polarity (default: Yes)
+ Tone Control (default: Yes)
Remember:
Any changes you make to parameters within the menu are automatically saved to the currently selected preset.
There is no need to save or confirm your changes. When you switch back to a preset, all its settings will be exactly as you last left them.
3. BLUETOOTH
The Kii Control allows you to stream audio wirelessly to your Kii speakers from any Bluetooth device (mobile phone, tablet, computer etc.). Please note that the distance between Bluetooth device and the Kii Control is limited by the kind of Bluetooth capable device you are using.
To select Bluetooth playback simply select "Kii Control" as an audio output in the Bluetooth settings of your device.
Once the device is connected, the Bluetooth input will automatically be selected for playback.
If you want to disable the possibility of connecting to the Kii Control via Bluetooth simply choose "Off" in Bluetooth menu entry.
The only user selectable option in this menu is the "Bluetooth On/Off" entry, all others display infos transmitted with the Bluetooth playback from your device (Audio, Title, Artist, etc.)
Bluetooth
Bluetooth On/Off
V5.0 R UID:09B9E9
State: Discoverable
Audio: Stopped
Title: ?
Artist: ?
Album: ?
4. PRO MENU
The Pro Menu comprises all functionality which is relevant in a professional studio environment,
If you are unsure what some of these options do and what their exact purpose is, simply leave them in the factory default settings.
4a) Latency
In the latency menu you can choose whether you are able to run the speakers in their most exact setting, which offers a full phase correction but introduces roughly 90ms of latency. In an audiophile listening environment this doesn’t impose any practical problems, so the „Exact“ setting is always the preferable and best sounding option.
(Full phase correction means, that the whole frequency spectrum radiated by the speaker does not have any unnatural phase shift, an artefact that is commonly induced by classical analogue crossovers. Clever DSP correction allows us to instead achieve a phase response that is identical to the original signal on the recording. This powerful calculation needs time, therefor latency cannot be avoided in this case.)
If you use your Kii SEVEN alongside a TV, beamer or set-top box which is not able to synchronise the picture to audio signal correctly, we offer the „Minimum Latency“ setting. This uses a less exact phase correction in the lower frequencies and therefor drastically reduces the necessary calculation time down to below 1ms. You can now easily adjust your TV, beamer or set-top box for the audio to be in sync with the picture again.
Even better, with „Frame Delay“ (in milliseconds) and „Fine Adjust“ (in microseconds) we offer two more tools to add a very exact delay setting to your audio playback, in case the adjustments in your video devices are limited.
The parameter choice is:
Phase: Exact / Minimum Latency
Frame Delay (ms) (general)
Fine Adjust (us) Settings (per speaker)
4b) Polarity
This setting offers control over either the absolute polarity of the playback (True/Inverse).
If a recording has (accidentally) inversed polarity, this offers the option of swapping polarity within the playback system for a correct acoustical endresult.
You also have the option to only listen to the Mid (L+R = Mono) signal, as well as only to the Side (L-R) content of a stereo signal.
These options are only of use in a PRO studio environment, for example for ciritical analysis during mastering. Swap L-R does not change polarity, but it swaps the channel order of both channels within a stereo signal.
A faulty, unintended channel swap can happen in various places upstream in the playback chain, sometimes even on the recording itself. This menu option offers a simple remedy for correct playback in this case.
For simple audiophile listening please leave this menu item in its default „True“ setting.
The parameter choice is:
True / Inverse / Mid (L+R) / Side (L-R) / Swap L-R
4c) Limiter Indicator
This is a Kii THREE ONLY feature, which is currently without function when in use with a Kii SEVEN.
4d) Advanced Filters
The Advanced Filters menu is a new feature introduced in firmware version 2.0 of the Kii Control.
Up to eight (8) filters can be programmed either for ALL speakers (Link all with master => YES), or each speaker individually (Link all with master => NO)
The up to eight filters per speakers are a global setting. You can not choose different filters per preset.
The Bypass all setting however acts as a master bypass for all advanced filters at once and can be saved per preset!
The parameter choice is:
Bypass all: Yes / No
Link all with master: Yes / No
Master Filters => submenu for Slave speakers
Filter # 1 (up to 8)
Restore Defaults
Type: Bypass / Low Pass / High Pass / Low Shelf / High Shelf / Notch / PEQ Const. Q / PEQ Prop. Q / Frequency Q / Gain
While the advanced filters offer a free and fully integrated alternative to external corrective EQ Systems in hardware or software (like for example TRINNOV, Dirac, Acourate or DSPeaker etc.) all of these solutions require knowledge and experience to set-up correctly for an audible improvement.
Professional advice of an experinced acoustician and correct measurement tools are highly recommended. If you are unsure what these filters do and what their exact purpose is, please leave them in the factory default setting. (Bypass)
4e) Set reading (xy) to 0
This is also a PRO feature, that is not necessarily of use in an audiophile listening setup. It allows the user to calibrate the speakers to a certain playback volume (e.g. a fixed volume in a mastering setup) and reset the volume read out in the Kii CONTROL to display 0.
This makes it easy to always return to a calibrated playback level in a mastering studio. Nothing else is changed other than the number in the display read out.
The parameter choice is:
Set reading (current reading displayed) to 0
5. SETUP MENU
The Setup Menu comprises all functionality needed to install a set of Kii SEVENs in a new location and establish the proper connections to your source devices.
5a) Master Speaker
In this setting you select whether the Kii Control is plugged into the LEFT or the RIGHT speaker of your stereo setup. This speaker is called the „master“, because it is directly connected to the Kii CONTROL via the KiiLink In.
The other speaker is called the „slave“, because it receives its data from the master speaker (1x CAT5 cable: Kiilink Thru of master into KiiLink In of slave).
This setting in the Kii CONTROL overwrites the physical „Input Select“ mini switch setting on the back of the speakers.
The parameter choice is:
LEFT/RIGHT
5b) Boundary EQ
The Boundary EQ adjusts the energy dispersion of the speaker below 130Hz where the ActiveWaveFocusing filters transition from cardioid into omnidirectional dispersion. If one or both speakers are placed closer to a wall or corner in the room, this will result in an unwanted energy build up due to the reflections from those surfaces adding to the direct sound.
Other than conventional speakers the Kii SEVEN can correct for those reflections with the help of the Boundary EQ.
With the Kii CONTROL the Boundary can be set for both speakers simultaneously, if the speakers are placed symmetrically in your room and have equal proximity to the back and side walls.
(Link all with master => Yes)
Alternatively the boundary settings can be set for each speaker individually, if their placement in your room is asymmetrical. (Link all with master => NO)
When „Link all with master“ is set to NO, individual Master and Slave menu entries allow for setting independent values.
The parameter choice is:
Link all with master YES/NO
Master: -6 (default)
Slave 1: -6 (default)
5c) Mute / Dim
To mute the speakers push the volume knob briefly, push again to unmute.
Activation is indicated by the two blinking LEDs on the Kii CONTROL and a reading in the display.
Alternatively to the MUTE function you can select a DIM function, which attenuates the playback level by a user definable amount instead of muting it completely.
Pushing the volume knob always operates the mute/dim function, even if you are currently using the menu.
The parameter choice is:
Mute / Dim: -10dB Dim / -15dB Dim / -20dB Dim / -30dB Dim / -40dB Dim / Full Mute
5d) XLR Input Settings
Besides the new inputs offered on the Kii CONTROL, the XLR input on the speakers remains providing connectivity for either a stereo analog signal or an AES source. The dedicated input select button „XLR“ on the Kii CONTROL activates the physical input on the back of the speakers. The XLR Input setting in the Kii CONTROL tells the speaker whether the connected source is Analogue or Digital (AES), it also overwrites the physical „Input Select“ mini switch setting on the back of the speakers as soon as the Kii CONTROL is plugged in.
The parameter choice is:
XLR Input: Analogue/Digital
5e) Auto Standby
The Kii CONTROL offers the possibility to power on or put the speakers into standby manually.
The speakers automatically power on when an input signal is detected, respectively go into standby after 15 minutes of no input signal present.
This automatic function can now be defeated, with only manual power on or off operation remaining from the Kii CONTROL.
This is especially handy in PRO/Studio use, where the speakers need to be permanently powered on.
To manually power down the speakers, press & hold the Volume Knob for 3 seconds.
To manually power up the speakers, turn the Volume Knob or touch any of the buttons.
The parameter choice is:
Auto/Manual
5f) BXT Settings
This is a Kii THREE ONLY feature, which is without function when in use with a Kii SEVEN.
5g) IR Remote Settings
The Kii CONTROL will recognise both Apple Remote and RC5 handsets.
To tell the Kii CONTROL which handset you want it to respond to select Imprint Remote and then on your handset push any button. The type of remote control and device code will be displayed to indicate that the operation was successful.
A new Kii CONTROL will do this automatically without requiring you to go to this menu. The first RC5 or Apple Remote that tries to talk to the Kii CONTROL will automatically be imprinted, so you only need this option if you accidentally imprint the wrong remote.
Apple TV Remotes are different from Apple Remotes, they use a proprietary protocol and won´t work.
The menu let´s you enable or disable IR control. You also have the choice if the channel buttons (<- / ->) should toggle through the inputs or the presets. As the input choice can be part of a preset, this allows you to tailor your channel buttons to different listening situations (Music, A/V setup, etc).
The parameter choice is:
IR Enabled (Yes/No)
Channel Buttons (Channel/Preset)
Imprint Remote
RC Type (this can´t be user set, it will only display a valid pairing)
RC Address (this can´t be user set, it will only display a valid pairing)
5h) LED Brightness
Here you can set the brightness of the Kii Control display. Maximum brightness is at „100“.
The parameter choice is:
Speaker On (not applicable for Kii SEVEN)
Speaker Standby (not applicable for Kii SEVEN)
Kii Control
Full Dim
5i) Restore Defaults
Selecting and confirming this menu entry with ENTER sets the Kii CONTROL back into its default factory state. All previous settings will be lost!
The parameter choice is:
Clear All Settings -> Enter
5j) About
The „About“ menu displays the currently installed firmware versions on all connected devices in the chain. Scroll down to device and press ENTER, the currently installed firmware version number will be visible.
The parameter choice is:
Kii Control
About Master Speaker
About Slave speaker