Important Safety Instructions
KiiLink is NOT a standard network connection !
Although common CAT5 cable and RJ45 connectors are used, KiiLink employs its own proprietary protocol.
Connecting a KiiLink port to a non-Kii product can cause permanent damage to your Kii THREE and voids the warranty!
NEVER connect a Kii THREE to a home network!
NEVER connect a Kii THREE to the Ethernet port of a computer!
Instructions for safe operation:
1 | Dangerous voltage is inside this apparatus. Opening is only allowed by qualified service personnel.
2 | Do not defeat the safety purpose of the safety earth connection. Use the provided three-prong power cord to insure the product is connected to safety earth. If the provided mains cord does not fit your outlet, consult an electrician for replacement of the obsolete outlet.
3 | Protect the power cord from being walked on or pinched, particularly at plugs, convenience receptacles, and the point where they exit from the apparatus.
4 | Unplug this apparatus during lightning storms or when unused for long periods of time.
5 | Do not use this apparatus near water. Do not expose the apparatus to dripping or splashing. Do not place objects filled with liquids (flower vases, drink cans, coffee cups, etc) on the apparatus. Do not use this apparatus out of doors.
6 | Do not install near any heat sources such as radiators, heat registers, stoves, or other apparatus that produce heat. Avoid exposure to direct sunlight.
7 | Use only with a speakerstand or table designed for use with audio or music equipment. In any installation, make sure that injury or damage will not result from cables pulling on the apparatus and its mounting.
8 | Refer all servicing to qualified service personnel. Servicing is required when the apparatus has been damaged in any way, such as when the power-supply cord or plug is damaged, liquid has been spilled or objects have fallen into the apparatus, the apparatus has been exposed to rain or moisture, does not operate normally, or has been dropped.
9 | To reduce the risk of fire or electric shock, do not expose this apparatus to rain or moisture.
Any damage resulting from the violation of these safety measures (especially by opening the apparatus or connecting non-Kii devices via the KiiLink ports) is NOT covered by the warranty.
Please be careful and reasonable with your extended listening levels.
Excessive sound pressure levels during longer periods of time can cause irreversible damage to your ears and health.
Package Content Kii THREE
The Kii THREE System consists of the follwing parts:
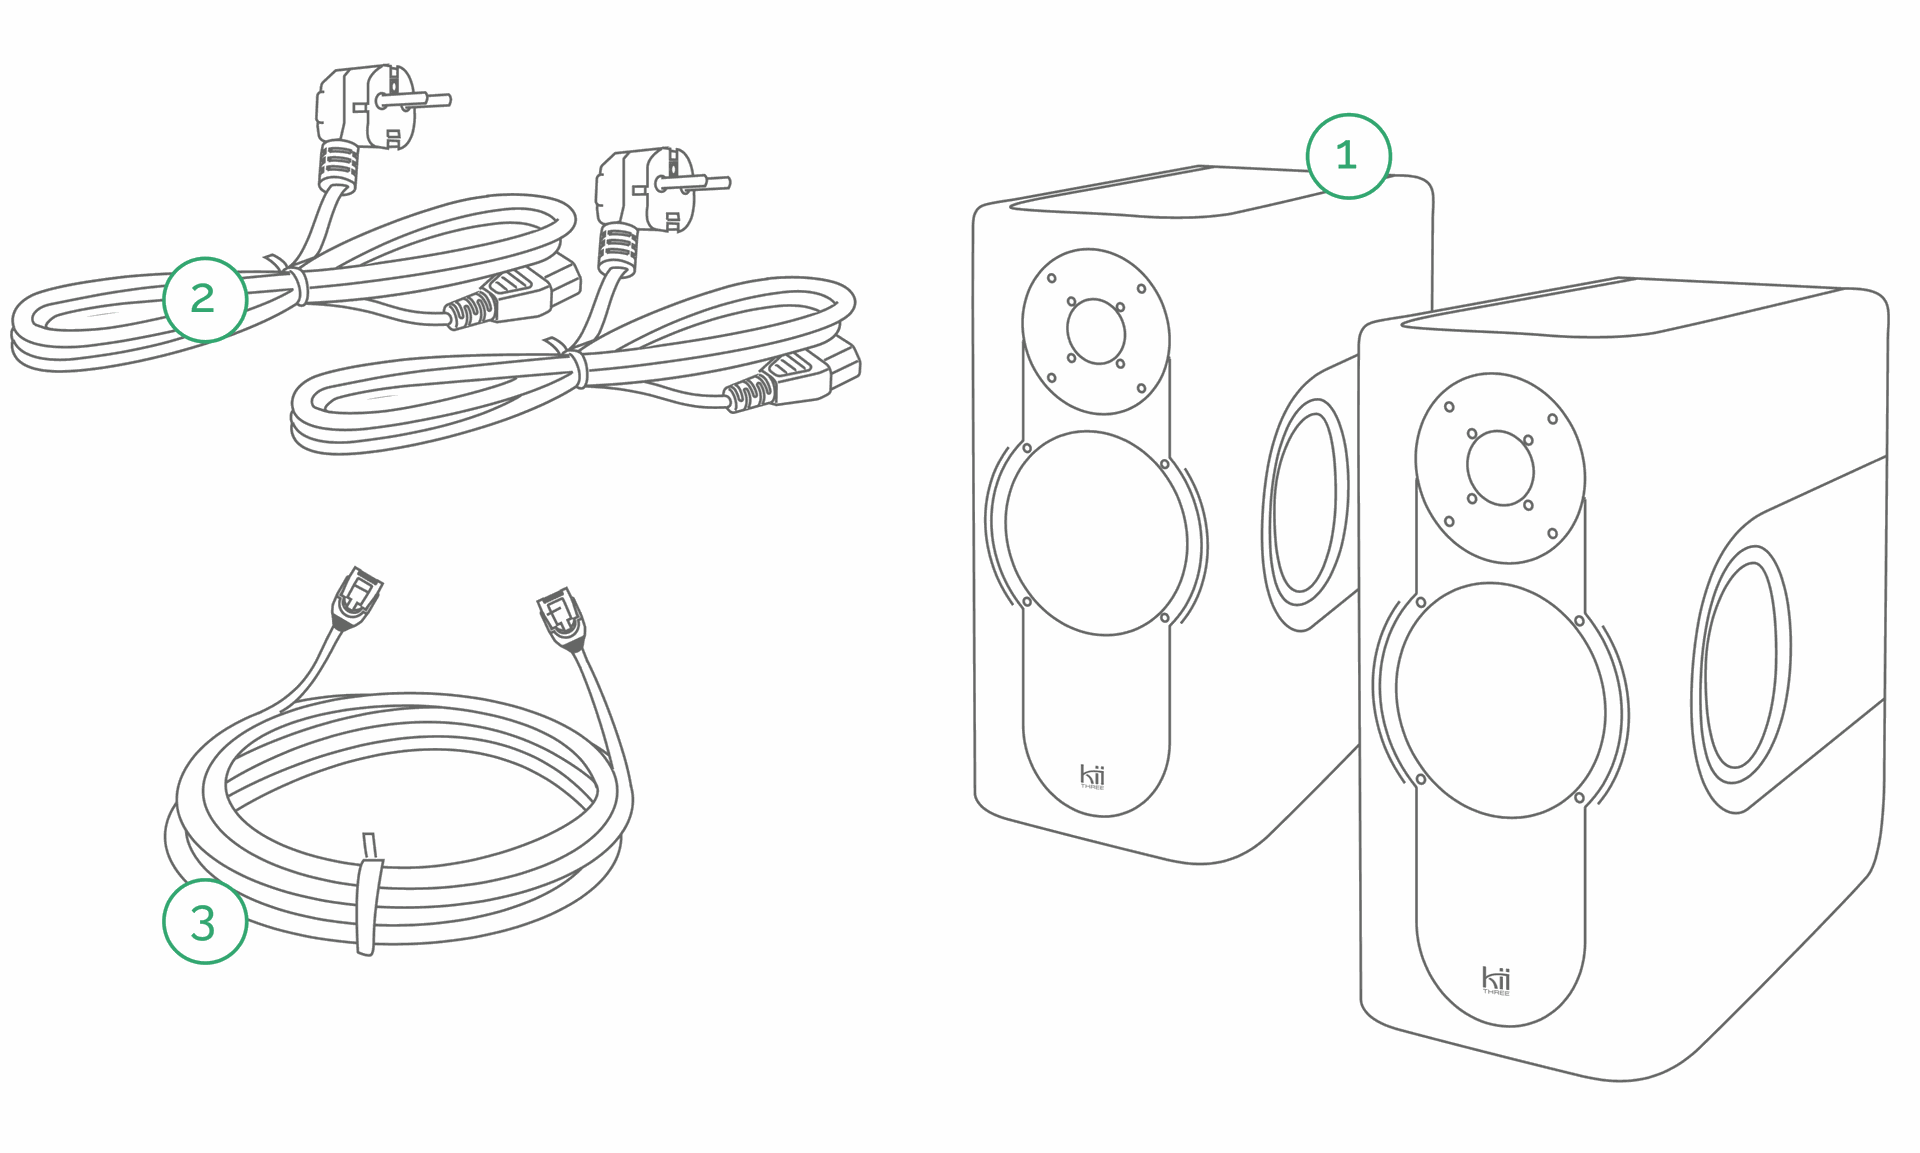
2x Kii THREE speaker
1x Kii Control
Cabling (2x mains cable, 2x CAT6 KiiLink cable, 1x USB cable for Kii Control)
PACKAGING: The speakers come in custom carton box packaging, fulfilling ISTA 3A standards.
OPTIONAL ACCESSORIES:
Kii THREE speaker stands (sofa height, typical for domestic listening)
Kii THREE speaker wall mount

Connecting the Kii THREE System
HOW TO CONNECT YOUR Kii THREE SYSTEM:
1. Mains cables for both speakers.
2. KiiLink cable (CAT6) between Kii Control and the KiiLink In port of your master speaker.
3. KiiLink cable (CAT6) between KiiLink Thru port of your master speaker and the KiiLink In port of your slave speaker.

VERY IMPORTANT:
KiiLink is NOT a standard network connection !
DO NOT connect the RJ45 (CAT cable) connector to a home network, any ethernet switch, hub nor the Ethernet port of a computer.
This can DAMAGE your speakers and will void the warranty!
Connectors on the Kii Control:
The connector panel on the Kii Control offers three digital inputs for your source devices:
1. USB (audio)
2. COAX (S/PDIF format)
3. Toslink / Optical (S/PDIF format)

The KiiLink port connects to the KiiLink In port of your master speaker via the supplied CAT6 cable.
The Kii Control also offers Bluetooth connection to wirelessly stream audio from your mobile devices or tablets.
- IMPORTANT NOTE -
As soon as the Kii Control is connected, the settings on the backpanel of the speakers will be overruled.
All settings can be controlled from the menu on the Kii Control, which we will explain in the next chapter.
Connectors on the Kii THREE

Here is an overview of the connector panel from left to right:
a) SERIAL NUMBER - This is the individual Serial No. for each speaker.
b) XLR INPUT - This is the single XLR Input connector which can be set to process analog or digital audio signals, depending on the setting in the XLR Input Settings menu on the Kii Control.
(or how the Select switch (c) is set, when used without Kii Control).
c) SELECT SWITCH - The select switch is overruled when a Kii Control ist connected! Leave at default.
(see chapter "Operation without Kii Control" otherwise)
d) P/R button - (RESET)
When the speaker is powered up, press and hold the button for 5 seconds, this resets the speaker.
The front LEDs will indicate this by blinking violet and yellow.
P/R button - (LATENCY MODE)
The Latency mode can be switched in the Kii Control Latency menu and can also be part of a preset.
Presets are easily switchable with the PRESET button on the Kii Control.
(see chapter "Operation without Kii Control" otherwise)
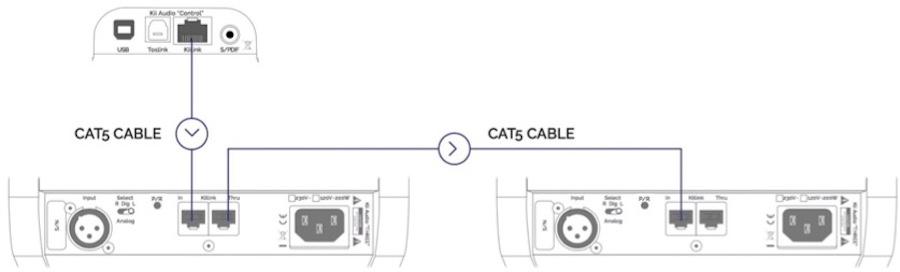
e) Kiilink connector
Since an AES signal contains both channels you will need to connect the second speaker to the first with a CAT5 cable so that both can receive the signal. The speaker that receives the AES signal is called a master and the second speaker is called a slave.
f) IEC Mains power connector
Each speaker is factory set and marked for either 230v or 115v. This can NOT be changed in the field.
POWER / STANDBY
The Kii THREE has no power switch. Simply plug the power cable into the IEC socket (f) .
If no audio signal is present at the input for more than 15 minutes the speaker will automatically go into standby mode. As soon as the input detects an audio signal it will automatically power on. This can take up to seven seconds.
(NOTE: The small white Boundary and Contour dials present on older Kii THREE speakers have been omitted in the current generation, they will be non-functional and overruled as soon as a Kii Control is connected)
Kii Control Operation
The Kii CONTROL is the USER INTERFACE for your speakers and works like a "digital preamplifier".
It provides additional digital inputs and gives you full control over the Kii THREE’s operating parameters, including volume control and input selection.
HOW DOES IT WORK?
The Kii CONTROL is operated by a single knob with push/click function surrounded by seven dedicated capacitive touch buttons .
The two lowermost buttons in conjunction with the knob are used for navigating the menu on the OLED colour display.
The main knob on the Kii CONTROL serves four different purposes:
1. Volume Control (turn)
To increase the volume simply turn the volume knob clockwise.
To decrease the volume simply turn the volume knob counter-clockwise. The display indicates the current volume level the Kii Three is set to.
2. Mute or Dim the speaker (press)
To mute the speaker push the volume knob briefly, push again to unmute.
Activation is indicated by the two blinking LEDs on the Kii CONTROL and a reading in the display.
Alternatively to the MUTE function you can select a DIM function in the Kii Control Setup Menu, which attenuates the playback level by a user definable amount instead of muting it completely.
Pushing the knob always operates the mute function, even if you are currently using the menu.
3. Power On / Standby (press and hold)
To power up the speakers turn the volume knob or touch any of the capacitive touch buttons on the Kii CONTROL. The speaker will immediately boot up and will be ready to play within seconds.
To power the speaker down into Standby simply press and hold the volume knob for 2 seconds.
4. Menu Scrolling (turn)
When you enter the menu (press ENTER) the volume knob changes its functionality.
It is now used for vertical scrolling through menu items or parameters values, instead of changing the current playback volume (Mute/Dim still works).
Horizontal navigation in the menu is done with the dedicated (Esc) and (Enter) buttons on the Kii CONTROL.
CHOOSING AN INPUT
Each source input has its own touch capacitive button for direct access: COAX / OPTICAL / USB / XLR
The LED next to the button will light up to indicate the chosen input.
The Coax Input (RCA jack) accepts digital signals in SPDIF format. (up to 24bit/192kHz)
Alternatively this can be used as a second AES input, by employing an adapter cable:
AES->SPDIF (110Ohm to 75Ohm)
The Optical Input (TOSLINK jack) accepts digital signals in TOSLINK format. TOSLINK optical is the common digital output for TVs or SAT-receivers, enabling you to use the Kii Three as speakers for your TV.
The USB Input offers audio input over the in-built USB audio interface. This enables you to play your digital audio files directly from a computer (Mac/PC/Linux) or Music server (with USB audio out) to the Kii CONTROL.
The XLR Input button selects the XLR input that is located on the backside of the speakers (not on the Kii CONTROL). It can be set to accommodate either an analog or digital AES signal.
When connecting an analog stereo source, simply connect two mono XLR cables to the XLR input on one of the two speakers.
(Kii Control -> Setup Menu -> XLR Input Settings -> analog)
When connecting a digital AES stereo source, use a single AES cable connected to the XLR input on the master speaker.
(Kii Control -> Setup Menu -> XLR Input Settings -> digital)
THE PRESET BUTTON
The preset button offers direct access to up to six user specified preset settings.
By repeatedly pressing the preset button you can toggle through all presets that you have previously saved.
You can make can make, add or delete presets and change their global behavior in the Preset menu.
The currently selected preset is indicated by the enlarged colour bar in the top of the display.
Every parameter change you make throughout the menu is always saved automatically for the preset that you are currently in. There is no save or confirmation dialog.
You can always toggle through the presets (preset button), even if you are deep inside the menu structure.
That way you can easily set for example a certain parameter for all presets.
THE Kii CONTROL MENU
Horizontal navigation in the menu is done with the dedicated (Esc) and (Enter) buttons,
while vertical scrolling through menu items or parameter values is done by turning the knob.
The push/click function of the knob is not used for navigation.
It always offers the MUTE/DIM function at any given time.
Every change is always saved automatically, there is no save or confirmation dialog.
To enter the menu press Enter. Now use the knob to scroll through the main menu level until the menu item you want to adjust is highlighted. Press Enter again to move the cursor right to the next level and set the values with the knob.
If the display shows the desired value simply move backwards through the menu with the Esc button.
Your setting is now automatically stored.
MENU OVERVIEW
- 1. TONE CONTROL
- 2. PRESETS
- 3. BLUETOOTH
- 4. PRO MENU (the Pro submenu contains:)
-
- 4a) Latency
- 4b) Polarity
- 4c) Limiter Indicator
- 4d) Advanced Filters
- 4e) Set reading (xy) to 0
- 5. SETUP MENU (the Setup submenu contains:)
-
- 5a) Master Speaker
- 5b) Boundary EQ
- 5c) Mute / Dim
- 5d) XLR Input Settings
- 5e) Auto Standby
- 5f) BXT Settings
- 5g) IR Remote Settings
- 5h) LED Brightness
- 5i) Restore Defaults
- 5j) About
1. TONE CONTROL
The Tone Control vastly expand the possibilities of the 16 preset rotary switch available on the speaker.
Where the switch offered a choice of various pre-configured settings, the Kii CONTROL offers two independent filters, a low shelf and a high shelf filter, that are fully user configurable.
This EQ type is called a Baxandall EQ and offers great flexibility with only 4 parameters.
Having access to these two filters individually allows you to tailor the corner frequencies and gain exactly to your liking.
"Bass Freq." determines the frequency below which this filter alters the frequency response of the audio signal.
"Bass (dB)" determines if the filter boosts or cuts the frequency range below the corner frequency.
"Treble Freq." determines the frequency above which this filter alters the frequency response of the audio signal.
"Treble (dB)" determines if the filter boosts or cuts the frequency range above the corner frequency.
In combination these two filters offer vast options to tailor the speakers frequency response to your desire.
If you want to cut a certain part of the midrange spectrum, simply boost the low and high frequencies outside the desired midrange spectrum and adjust the level accordingly, respectively vice versa for boosting it.
The gentle filter slopes will make sure that the resulting frequency response will always stay musical and useful for listening.
The parameter choice is:
- Bass (dB)
- Treble (dB)
- Bass Freq.
- Treble Freq.
2. PRESETS
In this menu you are able to enable your own presets, which you then can toggle through with the dedicated preset button.
The presets will be indicated by colour-coded bars that appear in the upper area of the display as soon as a second preset is defined.
To add a preset of your choice simply set the Kii CONTROL to the exact state that you want to add as a preset.
Enter the Program Preset menu and go through the available options in order to exclude or include certain parameters:
(Source, Delay/Lip Synch, Volume, Mid/Side/Polarity, Contour) This is a global setting for ALL presets.
If you set one of these parameters to „No“, it is excluded from the preset function and remains manually available from the Kii CONTROL.
If all parameters are set to your liking scroll to „Add new preset“ and press ENTER. Your preset is now successfully saved and will be available, when toggling the preset button.
If you want to remove a preset, simply select it with the preset button, scroll to Remove This Preset and press ENTER. The preset is now permanently erased again. Scroll and choose „Remove All Presets“, if you want to get rid of all existing presets and set them up from scratch.
The parameter choice is:
- Remove This Preset
- Remove All Presets
- Make 2 presets (Add third preset, Add fourth preset, etc.)
+ Source (default: NO)
+ XLR Mode (default: Yes)
+ Delay/Lip Synch (default: Yes)
+ Phase Correction (default: Yes)
+ Volume (default: NO)
+ Mid/Side/Polarity (default: Yes)
+ Tone Control (default: Yes)
3. BLUETOOTH
The Kii Control allows you to stream audio wirelessly to your Kii speakers from any Bluetooth device (mobile phone, tablet, computer etc.)
Please note that the distance between Bluetooth device and the Kii Control is limited by the kind of Bluetooth capable device you are using.
To select Bluetooth playback simply select "Kii Control" as an audio output in the Bluetooth settings of your device.
Once the device is connected, the Bluetooth input will automatically be selected for playback.
If you want to disable the possibility of connecting to the Kii Control via Bluetooth simply choose "Off" in Bluetooth menu entry.
The only user selectable option in this menu is the "Bluetooth On/Off" entry, all others display infos transmitted with the Bluetooth playback from your device (Audio, Title, Artist, etc.)
Bluetooth
Bluetooth On/Off
V5.0 R UID:09B9E9
State: Discoverable
Audio: Stopped
Title: ?
Artist: ?
Album: ?
4. PRO MENU
The Pro Menu comprises all functionality which is relevant in a professional studio environment,
If you are unsure what some of these options do and what their exact purpose is, simply leave them in the factory default settings.
- 4a) Latency
In the latency menu you can choose whether you are able to run the Kii Three in their most exact setting, which offers a full phase correction but introduces roughly 90ms of latency. In an audiophile listening environment this doesn’t impose any practical problems, so the „Exact“ setting is always the preferable and best sounding option.
(Full phase correction means, that the whole frequency spectrum radiated by the speaker does not have any unnatural phase shift, an artefact that is commonly induced by classical analogue crossovers. Clever DSP correction allows us to instead achieve a phase response that is identical to the original signal on the recording. This powerful calculation needs time, therefor latency cannot be avoided in this case.)
If you use your Kii THREE alongside a TV, beamer or set-top box which is not able to synchronise the picture to audio signal correctly, we offer the „Minimum Latency“ setting. This uses a less exact phase correction in the lower frequencies and therefor drastically reduces the necessary calculation time down to below 1ms. You can now easily adjust your TV, beamer or set-top box for the audio to be in sync with the picture again.
Even better, with „Frame Delay“ (in milliseconds) and „Fine Adjust“ (in microseconds) we offer two more tools to add a very exact delay setting to your audio playback, in case the adjustments in your video devices are limited.
The complete ActiveWaveFocusing and dispersion control of the Kii THREE however remains fully functional in Minimum Latency mode!
The parameter choice is:
Phase: Exact / Minimum Latency
Frame Delay (ms) (general)
Fine Adjust (us) Settings (per speaker)
- 4b) Polarity
This setting offers control over either the absolute polarity of the playback (True/Inverse).
If a recording has (accidentally) inversed polarity, this offers the option of swapping polarity within the playback system for a correct acoustical endresult.
You also have the option to only listen to the Mid (L+R = Mono) signal, as well as only to the Side (L-R) content of a stereo signal.
These options are only of use in a PRO studio environment, for example for ciritical analysis during mastering. Swap L-R does not change polarity, but it swaps the channel order of both channels within a stereo signal.
A faulty, unintended channel swap can happen in various places upstream in the playback chain, sometimes even on the recording itself. This menu option offers a simple remedy for correct playback in this case.
For simple audiophile listening please leave this menu item in its default „True“ setting.
The parameter choice is:
True / Inverse / Mid (L+R) / Side (L-R) / Swap L-R
- 4c) Limiter Indicator
The advanced limiters in the Kii THREE is a custom software algorithm designed by Bruno Putzeys.
While internally consisting of multiple intelligent detection algorithms precisely predicting at which point the incoming signal will be harmful to amplification or drive units in the speaker, the audible result is nothing less than stunning. It very likely offers the most unintrusive limiter ever used in a playback device and will therefor be barely noticeable in anything other than its most extreme actions.
In certain situations though (again mostly in PRO studio uses like mastering) you may prefer to actually know whenever the limiter becomes active and influences the playback signal. In this case you can set the Limiter Indicator parameter to YES and any intervention of the limiter algorithm will be fully indicated by the blinking LEDs.
The parameter choice is:
No/Yes
Clipping Indicator for Analog Inputs
If the LEDs flicker red very rapidly, the internal A/D converter is being clipped on the analog inputs.
Turn down the volume on your source device to avoid clipping.
- 4d) Advanced Filters
The Advanced Filters menu is a new feature introduced in firmware version 2.0 of the Kii Control.
Up to eight (8) filters can be programmed either for ALL speakers (Link all with master => YES), or each speaker individually (Link all with master => NO)
The up to eight filters per speakers are a global setting. You can not choose different filters per preset.
The Bypass all setting however acts as a master bypass for all advanced filters at once and can be saved per preset!
The parameter choice is:
Bypass all: Yes / No
Link all with master: Yes / No
Master Filters => submenu for Slave speakers
Filter # 1 (up to 8)
Restore Defaults
Type: Bypass / Low Pass / High Pass / Low Shelf / High Shelf / Notch / PEQ Const. Q / PEQ Prop. Q / Frequency Q / Gain (dB)
While the advanced filters offer a free and fully integrated alternative to external corrective EQ Systems in hardware or software (like for example TRINNOV, Dirac, Acourate or DSPeaker etc.) all of these solutions require knowledge and experience to set-up correctly for an audible improvement.
Professional advice of an experinced acoustician and correct measurement tools are highly recommended. If you are unsure what these filters do and what their exact purpose is, please leave them in the factory default setting. (Bypass)
- 4e) Set reading (xy) to 0
This is also a PRO feature, that is not necessarily of use in an audiophile listening setup. It allows the user to calibrate the speakers to a certain playback volume (e.g. a fixed volume in a mastering setup) and reset the volume read out in the Kii CONTROL to display 0.
This makes it easy to always return to a calibrated playback level in a mastering studio. Nothing else is changed other than the number in the display read out.
The parameter choice is:
Set reading (current reading displayed) to 0
5. SETUP MENU
The Setup Menu comprises all functionality needed to install a set of Kii THREEs in a new location and establish the proper connections to your source devices.
- 5a) Master Speaker
In this setting you select whether the Kii Control is plugged into the LEFT or the RIGHT speaker of your stereo setup. This speaker is called the „master“, because it is directly connected to the Kii CONTROL via the KiiLink In.
The other speaker is called the „slave“, because it receives its data from the master speaker (1x CAT5 cable: Kiilink Thru of master into KiiLink In of slave).
This setting in the Kii CONTROL overwrites the physical „Input Select“ mini switch setting on the back of the speakers.
The parameter choice is:
LEFT/RIGHT
- 5b) Boundary EQ
The Boundary EQ adjusts the energy dispersion of the speaker below 50Hz where the ActiveWaveFocusing filters slowly transition from cardioid into omnidirectional dispersion. If one or both speakers are placed closer to a wall or corner in the room, this will result in an unwanted energy build up due to the reflections from those surfaces adding to the direct sound.
Other than conventional speakers the Kii THREE can correct for those reflections with the help of the Boundary EQ.
With the Kii CONTROL the Boundary can be set for both speakers simultaneously, if the speakers are placed symmetrically in your room and have equal proximity to the back and side walls. (Link all with master => Yes)
Alternatively the boundary settings can be set for each speaker individually, if their placement in your room is asymmetrical. (Link all with master => NO)
When „Link all with master“ is set to NO, individual Master and Slave menu entries allow for setting independent values.
Here are some guidelines how to start setting up the Boundary EQ:
- If the speakers are positioned freely in the room the Boundary EQ should remain flat (0)
- If the speakers are placed close against a solid backwall the approximate setting would be around: -6
- If the speakers are placed close into a solid corner of the room the approximate setting would be around: -12
The minimum recommended distance from the backside of the speakers to the wall is ca. 10cm for the cardioid to work.
These are just guidelines. Play a track with a well recorded kick drum and adjust the setting so that it sounds powerful and tight. If it sounds thin, increase the number (towards 0). If it sounds flabby, decrease the number (towards -12).
The parameter choice is:
Link all with master YES/NO
Master 0
Slave 1 0
- 5c) Mute / Dim
To mute the speakers push the volume knob briefly, push again to unmute.
Activation is indicated by the two blinking LEDs on the Kii CONTROL and a reading in the display.
Alternatively to the MUTE function you can select a DIM function, which attenuates the playback level by a user definable amount instead of muting it completely.
Pushing the volume knob always operates the mute/dim function, even if you are currently using the menu.
The parameter choice is:
Mute / Dim: -10dB Dim / -15dB Dim / -20dB Dim / -30dB Dim / -40dB Dim / Full Mute
- 5d) XLR Input Settings
Besides the new inputs offered on the Kii CONTROL, the XLR input on the speakers remains providing connectivity for either a stereo analog signal or an AES source. The dedicated input select button „XLR“ on the Kii CONTROL activates the physical input on the back of the speakers. The XLR Input setting in the Kii CONTROL tells the speaker whether the connected source is Analogue or Digital (AES), it also overwrites the physical „Input Select“ mini switch setting on the back of the speakers as soon as the Kii CONTROL is plugged in.
The parameter choice is:
XLR Input: Analogue/Digital
- 5e) Auto Standby
The Kii CONTROL offers the possibility to power on or put your Kii THREEs into standby manually.
The speakers automatically power on when an input signal is detected, respectively go into standby after 15 minutes of no input signal present.
This automatic function can now be defeated, with only manual power on or off operation remaining from the Kii CONTROL.
This is especially handy in PRO/Studio use, where the speakers need to be permanently powered on.
To manually power down the speakers, press & hold the Volume Knob for 3 seconds.
To manually power up the speakers, turn the Volume Knob or touch any of the buttons.
The parameter choice is:
Auto/Manual
- 5f) BXT Settings
This menu will indicate if a BXT unit was detected, it also let´s you disable the BXTs (if you ever might want to do so).
The parameter choice is:
BXT Detected (Yes/No)
BXT Power (On/Off)
Please make sure you pause playback for switching from Kii THREE to Kii THREE BXT operation or back.
- 5g) IR Remote Settings
The Kii CONTROL will recognise both Apple Remote and RC5 handsets.
To tell the Kii CONTROL which handset you want it to respond to select Imprint Remote and then on your handset push any button. The type of remote control and device code will be displayed to indicate that the operation was successful.
A new Kii CONTROL will do this automatically without requiring you to go to this menu. The first RC5 or Apple Remote that tries to talk to the Kii CONTROL will automatically be imprinted, so you only need this option if you accidentally imprint the wrong remote.
Apple TV Remotes are different from Apple Remotes, they use a proprietary protocol and won´t work.
The menu let´s you enable or disable IR control. You also have the choice if the channel buttons (<- / ->) should toggle through the inputs or the presets. As the input choice can be part of a preset, this allows you to tailor your channel buttons to different listening situations (Music, A/V setup, etc).
The parameter choice is:
IR Enabled (Yes/No)
Channel Buttons (Channel/Preset)
Imprint Remote
RC Type (this can´t be user set, it will only display a valid pairing)
RC Address (this can´t be user set, it will only display a valid pairing)
- 5h) LED Brightness
Here you can set the brightness of the two indicator LEDs on the speaker exactly to your liking, depending on whether they are powered on or in standby. Likewise the brightness of the Kii Control display can be set. Maximum brightness is at „100“.
The parameter choice is:
Speaker On
Speaker Standby
Kii Control
Full Dim
- 5i) Restore Defaults
Selecting and confirming this menu entry with ENTER sets the Kii CONTROL back into its default factory state. All previous settings will be lost!
The parameter choice is:
Clear All Settings -> Enter
- 5j) About
The „About“ menu displays the currently installed firmware versions on all connected devices in the chain. Scroll down to device and press ENTER, the currently installed firmware version number will be visible.
The parameter choice is:
Kii Control
About Master Speaker
About Slave speaker
Unpacking the BXT
The BXT modules are delivered in a wooden crate.
Each crate contains:
2x BXT cabinets (stored resting on their back face)
2x footplates
2x matching connector plates for the Kii THREEs
1x accessory box
Unpacking:
- Straighten the locking metal tongues which are located around the upper perimeter of the crate to release the top lid.
- Lift the wooden lid off the top of the crate
- Take out the white accessory box and put it aside
- Take out the Kii THREE connector plates (if option 1 applies),
put them aside.
- Take out the two BXT footplates, packed underneath in a protective carton. Unpack and put them aside.
- Take out the fullsize top foam cover,
so you can see the two BXTs packed in Tyvek bags underneath.
- Lift the wooden side walls of the crate off, if easier remove the foam piece in the middle first.
The BXTs are secured with multiple foam pieces, which should now be easily removable.. - Lift each BXT unit from the pallet (2 persons),
the connector plates on the top and bottom of each BXT have a recessed grip to make it easier to handle them.
The Tyvek bags are cut open to access those grips!
- Carefully unpack the BXT modules from the protective Tyvek bags.
- Before mounting the BXT modules onto the footplates, please check the lettering on the backpanel for correct orientation (top/bottom)
- Place the BXT modules on a flat surface with the Tyvek bag underneath to prevent damage.
Unpack the rest of the accessories and keep them at hand.
- Unpack the eight spikes from the accessory box and screw them evenly into the threads of the two footplates. You can use a 5mm allen key for tightening.
-
Screw in the spikes fully flush with the bottom of the footplate, so that the tip of the spike does not protrude and can not scratch your floor. The spikes will
ONLY
be used to mount the four supplied spike caps on top. The footplates will rest on the felt gliders only.
- Position the footplates in the preferred location for the speakers.
The footplates have felt gliders that will protect wooden, laminate, vinyl or other hard floors and will offer a firm positioning. - Screw on the four spike caps.
OPTIONAL: USE OF SPIKES (for concrete or carpet over concrete floors)
- Use the adjustable spikes to secure a solid and level position for the BXT footplate.
- Use the 5mm allen key to screw the spikes further in so they do protrude through the footplate until you´ve reached the suitable height.
- If you want to make use of third party isolation products instead of the supplied spikes, make sure you order them in the correct thread and pitch size, which is: M8 / pitch 1.0mm.
Setup and Operation - BXT
Step 1 - How to mount the Kii THREE connector plate:
Place your Kii THREE upside down onto a flat and clean surface, using a soft blanket or towel underneath to protect the cabinet from scratches. Check if the bottom panel is clean and free of any residue from the stands.
Take the 2mm hex key and unscrew the 4 screws that hold the black aluminium bottom panel, take them out and put them aside, but leave the bottom panel in place.
Place the connector plate that was supplied with the BXTs flush onto the bottom panel,
it should fit nicely against the curved front of the cabinet so that the screwholes line up.
Use the longer hex screws that are supplied with the BXTs to fit the connector plate onto the existing bottom plate of the Kii THREE. Screw them only handtight.
Step 2 - Mounting the BXT cabinet onto the footplate:
Take look at the backside of the BXT module to verify they are in the correct orientation and not upside down, the lettering should be readable.
Position the BXT onto the footplate by lifting it up with the grip in the top of the module.
Start by slowly lowering the cabinet with the bottom of the BXT placed at the rear end of the groove in the footplate ́s connector plate.
Make sure the cabinet stands upright and does not tilt forward or backward.
When the connector plates of the BXT module and the baseplate appear to be vertically flush from the side and the grooves seem to match, gently push the whole cabinet forward onto the footplate until the fronts of the connector plates are flush.
It might be helpful to have a second person hold the footplate in place while pushing the cabinet forward.
Step 3 - Mounting the Kii THREE onto the BXT cabinet
This works exactly the same as previously mounting the BXT module onto the footplate.
Gently lift the Kii THREE onto the top connector plate of the BXT with the front of the Kii Three connector plate fitted into the back half of the groove.
Make sure the Kii THREE is upright and slowly push the speaker forward into the groove of the BXT connector plate.
Make sure the two connector plates line up at the front.
Now your Kii THREE BXT is ready to be cabled up.
Step 4 - Connecting Kii THREE and BXT module
There are four short connector cables supplied with each BXT:
1x XLR
1x Mains power
2x CAT6
The connectors on the Kii THREE and BXT line up vertically, please connect the four cables as shown on the picture below. Make sure they are not twisted.
Your Kii THREE and the BXTs will now behave as a single large floorstanding speaker,
we will therefore henceforth refer to it as the Kii THREE BXT

Step 5 - Connecting your Kii THREE BXT System
If you look at the connector plate on the bottom of the BXT module, you will see that it mirrors the layout of the connectors on the Kii THREE. The connector panels on the bottom will now be the used to connect to the Kii Control as well as to connect the master and slave speaker with each other for the KiiLink protocol:
CAT cable 1 = KiiLInk Output of the Kii CONTROL into the KiiLink In of either your left or right BXT module (bottom), which ever is closer or more convenient to reach with the CAT5 cable.
This is now your „master speaker“.
CAT cable 2 = KiiLink Thru of your master BXT module into the KiiLink In of the second BXT module (bottom). This is now the „slave speaker“.

DONE ! - You can now control the Kii THREE BXT system with your Kii Control.
For further operation please revert back to the Kii Control manual here to see the full overview of the menu functions.
To get started, it´s necessary to check the two most important settings first, go to Setup Menu:
Master Speaker -> choose LEFT or RIGHT
(depending on where you plugged in the Kii Control, this is the master speaker)
Boundary EQ -> choose if the speaker is positioned close to a wall or free standing in the room
(0 = free standing, -6 = wall proximity, -12 = corner proximity)
Assembly Speakerstands
Package contents:
2x base plates (with 4 mounting holes for spikes, Kii Logo indicates the front side)
2x top plates
2x metal columns - no cut out
2x metal columns - cable cut out (position to the backside)
2x short mounting screws for top plates
2x long mounting screws for base plates
For optional use:
8 spikes (for use with carpet on concrete floor)
Assembly Steps:
Use the four screws to secure the top and bottom plate to the columns, don´t tighten the screws until they are neatly in place.
Make sure the cable cut outs of the two rear columns point towards the backside of the stands.
The parts that should be left is: 8 washers, 8 nuts and 8 spikes.
If you want to make use of the spikes: they are screwed into the four holes on the bottomside of the base plate.
Use the thread of the spikes to make sure the stand is resting firm and upright, then use washers and nuts to secure the spikes in their position.
Kii THREE Wall Mount System
In situations where setting up a pair of Kii THREEs on its matching speaker stands is not an option,
we offer a matching Kii Audio "Wall Bracket" as a solution for a fully wall mount Kii THREE System.
Here are the dimensions:

Operation without Kii Control
The Kii THREE can be operated without Kii Control as a simple active speaker.
The Kii THREE can be operated without a Kii Control, if you only use a single source which offers a high quality volume control.
Analog signals can be connected via two cables to the respective XLR Input of the left and the right speaker.
Please make sure the SELECT SWITCH (c) is set in the middle position to analog.
Digital signals (AES / SPDIF) can be connected via a single digital cable (transmitting both channels, left and right) to the XLR Input of the master speaker. The KiiLink connection (CAT6 cable) from the master to the slave speaker will distribute the input signal digitally between both speakers.
Please make sure the SELECT SWITCH (c) is set to the left position on the left speaker and to the right position on the right speaker.
The digital input signal is always transmitting both stereo channels to all speakers.
The SELECT SWITCH (c) will choose if the respective speaker plays back the left or the right channel of the stereo signal.
Speaker backpanel controls
XLR INPUT
This single XLR Input connector can be set to process analog or digital audio signals, depending on how the Select switch (c) is set.
SELECT SWITCH
This is a three way switch. If it is set in the middle position the XLR input functions as an analog input. The outer two positions operate the XLR input as an AES digital input and set the speaker to play either the left or right channel.
P/R button - (RESET)
Press and hold the button for 5 seconds, this resets the speaker. (The front LEDs will indicate this by blinking violet and yellow)
P/R button - (LATENCY MODE)
A short press of the button will toggle between normal and low latency mode.
(When changing modes the front LEDs will light up in red momentarily;
two LEDs indicate normal mode has been engaged, one LED indicates low latency mode has been turned on.
Kiilink PORTS
Since an AES signal contains both channels you will need to connect the second speaker to the first with a CAT5 cable so that both can receive the signal.
The speaker that receives the AES signal is called a master and the second speaker is called a slave. Connect the port labeled thru on the master speaker to the port labeled in on the slave speaker. You may still want to make this connection even when you only use an analog source if you need to switch the latency mode regularly. When the speakers are connected changing latency mode on the master will automatically do the same on the slave.
Firmware Updates
This article helps you update the firmware on your Kii Control and Kii THREE or Kii THREE BXT.
All Kii Audio products are DSP based and run on a dedicated firmware designed by our engineering team.
This offers the big advantage that we are able to improve features and performance over time for all our existing customers, your Kii products keep getting better and better!
To update your Kii System we offer a free software tool, which you can download here:
HOW TO USE THE UPDATE TOOL:
1. Simply download and install the extract the application folder onto the desktop of your computer.
(On Mac OS X unzip and mount the .dmg file)
2. Keep your Kii System connected as usual, power on the Kii Control and speakers, but STOP any music playback.
3. Connect the USB Input on the Kii Control to a free USB port on your Mac or PC with the included USB cable.
4. Start the Kii Update Tool by doubleclicking the icon.
(If you are on Mac OS X you might have to right click and select "open" instead of double clicking and then con rm the dialog)
The application is super easy to use and only has TWO buttons:
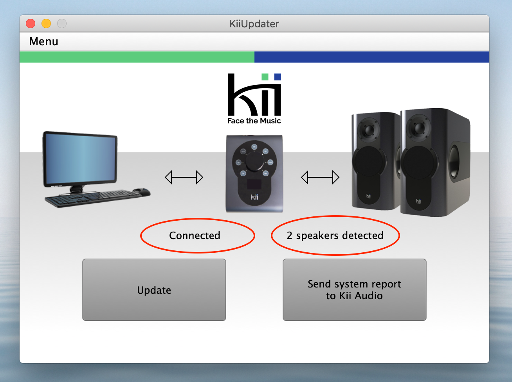
The update runs automatically. All other input functions are blocked during the progress.
Please do NOT unplug any cable in the middle of the update procedure!
Button 1: UPDATE
The Update button starts the update procedure, during which progress bars will be indicating which parts of the system are currently updated.
ALL connected devices will be checked and updated to the most recent firmware version.
The Kii Control contains one firmware file, each speaker contains two firmware files (PIC & DSP). Each BXT one firmware file.
In case it´s necessary to reboot the Kii Control after it has been updated, the update tool will show an instructional message.
Please do so by following these 5 easy steps:
1. Unplug the CAT5 cable and the USB cable from the connectors on the Kii Control.
2. Check that the display is dark and the Kii Control completely powered off.
3. Plug the CAT5 cable and the USB cable back into the Kii Control.
4. The display on the Kii Control will boot up and show a message to "Update your Kii System"
5. On your computer press OK on the message in the Kii Update Tool. The update process will now continue automatically.
After the Update was successful you will be prompted with a message displaying the installed rmware versions, for example like this.
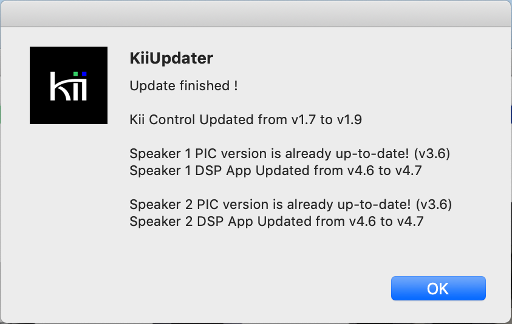
Press OK and your update is done!
TROUBLESHOOTING
If you get an error message displaying that the updated has failed, don ́t worry! You cannot damage your speakers by using the update tool!
Check if Kii Update Tool still displays the Kii Control as connected and 2 speakers detected in the GUI?
1. If yes, simply press the Update button again and repeat the procedure until you get the "Update finished!" notification.
2. In case the connection between Kii Update Tool and Kii Control is lost, please close the application, disconnect the USB cable from the computer. Powercycle the speakers (and Kii Control), plug the USB cable back into the computer an launch the application again. Chances are big that the connection will be re-established and the update procedure can be repeated.
3. If you are unable to successfully update the system, please contact our customer service at:https://www.support.kiiaudio.com/ticket
Technical Data
Kii THREE - Compact DSP controlled monitor speaker
LATENCY
Minimum Latency Mode:
Analog input (A/D - D/A) = 1030us (or 1,03ms)
Digital input (D/A only) =
@ 192kHz = 945us (or 0,945ms)
@ 96kHz = 860us (or 0,860ms)
@ 48kHz = 1540us (or 1,540ms)
Exact Mode (linear phase response):
approximately 90ms
DRIVE UNITS
4 x 6.5” woofer,
1 x 5” midrange,
1 x 1” waveguided tweeter,
all active drivers
AMPLIFICATION
Kii THREE (single unit): 1.500 Watt full-custom Class-D
BXT (single unit): 2.000 Watt full-custom Class-D
Active Wave Focusing crossover filter
Frequency response:
± 0,5dB - 25 kHz;
Kii THREE: 30Hz -3dB (20Hz -6dB) (*)
Kii THREE BXT: 20Hz -3dB (*)
Integrated TONE CONTROL
Boundary correction for free-standing, near wall or in corner
Intelligent protection limiters
Controlled Directivity: 4.8dB (54Hz - 1kHz, slowly rising thereafter)
Automatic Standby Mode
INPUT CONNECTIONS
Analogue - symmetrical / XLR (max. input level +6dBu)
AES/EBU - symmetrical / XLR (up to 24/192kHz)
SPDIF - coaxial / RCA (up to 24/192kHz)
TOSLink - optical / (up to 24/96kHz)
USB Audio - LPCM up to 24/384kHz (DXD) and DSD64/128 (as DoP)
(direct connection to computer recommended, no USB hub)
POWER CONSUMPTION
Kii THREE System: average music playback: 90 Watts / short term peak: 3.000 Watts
Kii THREE BXT System: average music playback 120 Watts / short term peak: 7.000 Watts
Kii THREE size:
20x40x40cm, 8”x16”x16” (WxHxD) - single speaker
Weight: 19kg (40lbs)
Kii THREE BXT size:
20x117x40cm, 8”x46”x16” (WxHxD) - single speaker, fullstack
Weight: 56kg (123lbs)
Threadsizes for spikes:
Kii THREE stand: M8, pitch 1,25mm
BXT footplate: M8, pitch 1.0mm, (5mm allen key hole for tightening)
(*) IEC60268-5 Paragraph 20.6
Pro Audio FAQs
Speaker setup steps
- Place the Kii THREEs on solid and sturdy stands!
Acoustically solid speaker stands are defnitely preferable to placing them on a meterbridge or desk platforms.
If the surface they are resting on isn ́t extremely solid, try to use decoupling devices like IsoAcoustics feet, Iso-Stands, DMSD or even EVP.
- Speaker height (acoustical centre):
The center point between tweeter and midrange should be at ear height.
- Speaker distances:
The minimum clearance between the rear woofers and the front wall is approx. 10cm (4 inches).
The minimum clearance from the side woofers to any massive object nearby should be at least 30cm (12 inches) or more.
IMPORTANT: The airflow around the speakers has to be unobtrused for the cardioid dispersion to work correctly.
It is preferred to have a listening distance of at least 120cm (48 inches) to the Kii THREEs. There is not really a maximum listening distance or room size, the center image is still stable even above 5m distance in an equilateral triangle.
- Where to put them in the room?
Regular speakers with the cabinet size of a Kii THREE are usually working best in a nearfield setup.
Don ́t let the size fool you:
With the Kii THREE you are free to position the speakers closer to your front wall (or even room corners) and set them further apart in more of a classic "midfield" setup as often used in bigger studios or mastering rooms.
The highly reduced acoustic interaction with the room because of the cardioid dispersion allows for far more flexibility in terms of speaker positioning. Please try the different setups nearfield to midfield in your room for yourself and you will be surprised.
It´s especially worthwile to test how they sound with minimum distance of the rear woofers against your front wall In this case the impulse response will be extremly tight and approach that of a flush (soffitt) mount system. (Minimum distance 10cm / 4" - Boundary EQ should be set to -6)
- CABLING
Step 1.: MAINS: Connect the supplied mains cable to the IEC connector on the backpanel of the Kii THREE and to your mains socket
Step 2.: KiiLink cable (CAT5 or CAT6) between Kii Control and the KiiLink In port of your master speaker.
Step 3.: KiiLink cable (CAT5 or CAT6) between KiiLink Thru port of your master speaker and the KiiLink In port of your slave speaker.
- IMPORTANT NOTE -
As soon as the Kii Control is connected, the settings on the backpanel of the speakers will be
overruled.
ALL settings can be controlled from the menu on the Kii Control, all settings on the backpanel can be left in their default position.
KiiLink is NOT a standard network connection !!
NEVER connect a Kii THREE to a home network and NEVER connect a Kii THREE to the Ethernet port of a computer!
- What is a "DSP speaker system"?
The Kii THREE is a DSP based speaker system with a high resolution internal volume control and integrated input switching. Next to volume and source switching, all menu settings can also be operated from the Kii Control.
The Kii THREE System is both: a high end speaker and monitor controller in one
The digital inputs (AES, SPDIF, Toslink, USB Audio) are fed directly into the DSP.
The analog inputs (XLR on the speaker) employ a high-end A/D converter and then are also fed into the DSP as well.
The DSP controls the volume and calculates all necessary lter coe cients (crossover, cardioid dispersion control, calibrated frequency response, coherent phase response in exact mode, etc). From there the DSP utilises 6 DACs to feed every individual driver it ´s unique signal.
Should I use my analog monitor controller?
Even when you already own an analog monitor controller in the top league (Grace m905, Cranesong Avoset II, Dangerous Monitor St, etc) the full integration of the monitor control features into the speaker DSP will be more transparent. Especially because you can fully stay in the digital domain avoiding any extra D/A - A/D conversion.
Answer: Yes you could, but once you hear the difference you will want a Kii Control, no doubt.
Analog or digital inputs?
SHORT ANSWER: Use the DIGITAL INPUTS (USB/SPDIF/Toslink/AES) whenever possible.
SLIGHTLY LONGER ANSWER:
If you are using no other audio interface, the USB input on the Kii Control will perfectly work as your audio
interface + monitor controller!
If you use a third party audio interface / converter for I/O in your studio (such as for example from MetricHalo, UA Apollo, RME, Apogee, Lynx etc.), the best option is to use a digital output from this audio interface as your monitoring source feeding S/PDIF or Toslink into the Kii Control or AES/EBU into the master speaker (thus avoiding an unecessary extra conversion step).
A QUICK STORY: "You always want to monitor exactly what you capture!"
In today ́s world of DAW based audio production the work you deliver to your clients will be a digital file.
This is your end product in its original state by which your work will judged.
It doesn ́t matter if you work fully ITB with plugins only, if you use outboard on analog inserts, if you use analog summing, an analog mixbus chain or even a vintage console going back into the computer through your A/D.
A QUICK STORY: "You always want to monitor exactly what you capture!"
In today ́s world of DAW based audio production the work you deliver to your clients will be a digital file.
This is your
end product
in its original state by which your work will judged.
It doesn ´t matter if you work fully ITB with plugins only, if you use outboard on analog inserts, if you use analog summing, an analog mixbus chain or even a vintage console going back into the computer through your A/D.
In 98% of all cases the final result will be a digital downmix, recorded onto a print track or rendered via an offine bounce. This is true even for the people who are still able to work on analog tape, the final print delivered to the label will most likely be a digital file.
You want to be able to hear and evaluate your final results as exact as possible with your monitoring system.
You want to avoid any uncessary extra D/A <-> A/D conversion steps in your monitoring chain.
Therefore
= USE THE DIGITAL INPUTS ! – "You always want to monitor exactly what you capture!"
Why do you have analog inputs then?
The analog inputs uitilise high end, clean A/D conversion. You can absolutely use these when an analog monitor output is your ONLY option.
Also if you are working on an analog console with a tape machine, the analog inputs will work perfectly ne for you as the A/D conversion is super transparent. When fast work ow on an analog console is the most important thing, yes ...use the analog inputs!
Adjust the volume level on the Kii Control in tandem with the volume knob of your monitor section for usable gain staging in practice.
Using both digital and analog inputs to A/B:
When combining ITB mixing with either analog summing or even just using a nal D/A - A/D loop to insert analog compressors and EQ on your master bus the analog inputs can also be used to monitor your 2-bus processing before your A/D converter.
This enables you to A/B compare the end of your analog procession chain and the nal signal you capture in your DAW (post limiting for example) simply by switching inputs on the Kii Control.
This feature is usually only available from high end mastering consoles and can be a great help for mixing and mastering setups.
Advanced Filters (PRO MENU)
The Advanced Filters menu offers up to eight (8) individual filters per speaker, accessible from your Kii Control.
You can find them by entering Main Menu => Pro Menu => Advanced Filters
While the advanced filters offer a free and fully integrated alternative to external corrective EQ Systems in hardware or software (like for example TRINNOV, Dirac, Acourate or DSPeaker etc.) all of these solutions have one thing in common, they require knowledge and experience to be set-up correctly in order to achieve an audible improvement.
Professional advice of an experienced acoustician and correct measurement tools are highly recommended.
Corrective EQ can and should not replace acoustic treatment it should only help to fix the last percents. Less is more!
Disclaimer: If you are unsure what these filters do and what their exact purpose is, please leave them in the factory default setting.
These can be programmed either for ALL speakers (Link all with master => YES), or each speaker individually (Link all with master => NO)
The up to eight filters per speakers are a global setting. You can not choose different filters per preset.
The Bypass all setting however acts as a master bypass for all advanced filters at once and can be saved per preset!
Here are the filter options you can choose per filter explained below:
Bypass / Low Pass / High Pass / Low Shelf / High Shelf / Notch / PEQ Const. Q / PEQ Prop. Q

Connecting source devices
The Kii THREE system and the Kii THREE BXT system offer lots of connectivity for your music source devices.
Whether you are listening to a Music Streamer / Server, CD Player or Drive, a Mac, a PC, a Linux based mini PC with ROON, your turntable + phono preamp, or a good old FM tuner.... we have you covered.
The Kii CONTROL is the user interface for your speakers and offers you all the functionality of the classic "preamplifiers" in the hifi systems of yesteryear. It provides additional digital inputs and gives you full control over the Kii THREE’s operating parameters, including volume control and input source selection. Technically however the whole is a fully integrated playback system offering you the shortest and cleanest possible signal path and best audiophile performance.
Here are the most typical source devices and their connections:
1. Music Streamer / Music Server / Network Bridge
The most common way to access your music these days, offering the most possibilities for playback options of your choice. You can choose music streaming solutions from a wide variety of brands offering vastly different features in all price ranges.
- Most of them offer in-built applications of the most popular online streaming services.
(for example: Qobuz, Spotify, Tidal, Apple Music, Pandora, TuneIn Radio, Google Play, Amazon Music or YouTube)
- Most of them offer "audiophile" playback options of ALL your music files, including high resolution files up to 24bit/384kHz.
- Some offer the option to rip your CD collection for easy storage on in-built or external harddrives, or attached network storage (NAS).
Whatever type of file or stream you are listening to, you are using a DIGITAL SOURCE, therefore you should connect it digitally to your Kii System. This will circumvent any unnecessary D/A and A/D conversion step, which can otherwise have a negative impact on your audio quality.
The preferred connections to the Kii Systems are:
USB - to the Kii Control
S/PDIF (Coax) - to the Kii Control
AES/EBU (XLR) - to the master speaker
Toslink (optical) - to the Kii Control
2. CD Player / CD Drive
The classic music collectors choice of the last (almost) 40 years. The invention of the redbook format played back from the Compact Disc has established digital distribution of music as the de facto worldwide standard. Avoiding the hassle and complexities of analog turntables and tape machines, CD Players offered ease of use and CDs were less prone to damage than vinyl or tape.
Music on a CD is stored as a digital data format (redbook) in 16bit / 44,1kHz resolution.
A CD Drive reads out the data files from the CD and outputs them as a digital audio signal.
A CD Player is simply a CD Drive + DAC (Digital-to-Analog Converter) in one box, so it could also output an analog audio signal to a preamp. Many CD Players offer also a digital output (e.g. S/PDIF), which outputs the digital audiosignal from the CD Drive, leaving the internal DAC (Digital-to-Analog Converter) unused.
CD Player Analog Outs:
The analog outputs can be used in theory, but keep in mind that you are converting your CD data to analog, then in the Kii THREE it get´s converted back to digital for the DSP, after which it is again converted back to analog for each individual amplifier & driver.
This is unnecessary, will degrade sound quality and is not recommended. When using a digital medium, connect it digitally!
The preferred connections to the Kii Systems are:
S/PDIF (Coax) - to the Kii Control
AES/EBU (XLR) - to the master speaker
Toslink (optical) - to the Kii Control
3. Computer (Mac, Windows, Linux)
Among all amenities that the computer offers, many people have also stored their music library on it or use it to listen to online radio, or movies on youtube with many different applications as iTunes, VLC Player, or from a browser. Later specialized music playback applications like Amarra, Audirvana or PureMusic promising improved audio quality for playback have also won the hearts of many audiophiles offering an alternative to a dedicated music server.
This is especially true for one of the most impressive software music playback and library solutions: ROON
Roon can be used in various configurations incorporating Computer, Linux MiniPCs, NAS and Streamers functioning either as library core, playback device, remote application or even as all at once on any Mac or PC (it also has Qobuz & Tidal streaming options built in!)
No matter how or from where you play back audio on your computer, if you plug in the Kii Control via USB it will be recognized as a soundcard allowing you to select the Kii Control as your audio output device. You might be able to find cheaper computer speakers on the market, but hardly any better ones, give it a try!
The preferred connection to the Kii Systems is:
USB cable - to the Kii Control
4. Vinyl records / Phono
Many people still love and cherish their old (and new) vinyl records and turntables. The combination of this old playback medium with a highly innovative Kii playback system is no contradiction at all, when you want to hear your records as good as you never have before.
High quality turntables, tonearms, cartrige systems and phono stages are still manufactured and sold in all price categories to the music lovers, audiophiles and DJs all over the world. Some of the best companies are frequently using Kii systems to demo their state-of-the-art turntable creations, often costing more than the speakers.
Despite the soundquality and convenience of modern music streaming there are various reasons why people still hold some records in high regard, one of them is simply that you might prefer the sound of the physical vinyl release over the CD/download release. Often times people are not aware that both releases might have gone through two fundamentally different mastering sessions, with slightly different technical and artistical sound choices. Therefore comparing the sound of CD vs. Vinyl is often a completely moot point:
they are simply NOT the same music.
If you enjoy your vinyl records, nothing should stop you from doing so on pair of Kii THREEs or Kii THREE BXT.
The preferred connection to the Kii Systems is:
Turntable -> Analog PHONO Preamp -> XLR Inputs on each Kii THREE or Kii THREE BXT speaker
Turntable -> PHONO Preamp with internal A/D Converter -> AES/SPDIF/Toslink Output to the master Kii THREE (BXT) or Kii Control
The output of a turntable has a very low level and can not be connected to a regular input!
It needs to be plugged into a PHONO PREAMP which amplifies the signal up to line level and applies the RIAA equalization curve. The analog Line Out of the PHONO PREAMP can then be plugged into the analog inputs on the Kii THREE (BXT).
The playback volume is still controlled losslessly within the speakers via the Kii Control.
ANALOG LEVELS:
The analog inputs on the Kii system has a maximal input level of +6dBu
Standard analog line levels are +4dBu for symmetrical connections and -10dBv for single ended connections common in hifi gear. If the LEDs on your Kiis start to blink red furiously and the sound is harsh and distorted, the phono preamp is clipping the input stage.
Please contact your dealer or the manufacturer of your phono preamp if your output is too low, or if you´re clipping the Kii inputs. Most phono preamps don´t have a volume knob, but often offer internal trimmers or switches to set the overall gain range.